In this post, we are going to increase the size of the VDI file simulating the hard disk associate to one of our guest OS in VirutalBox.
What is the VDI file?
VirtualBox uses VDI files as the place to save all the information, that means, filesystems configured in your guest OS.
In the HOST OS is a normal file with extension VDI, which means Virtual Disk Image.
Why should I increase the size of a VDI file?
The short answer is because you are scarce of free space in your guest OS.
When you install a Guest OS with VirtualBox, during the initial configuration process, the setup requires you to set the size dedicated to the system. This is the size of your virtual filesystem (VDI file) that will be used during the installation of the guest system. There are several options, a fixed size for a VDI file, or dynamic (recommended and default). The differences of these two systems is, that the first one reserves the space from the beginning of the installation, occupying free space in your HOST OS. The second option will increase according to the occupied space inside the guest OS.
The first option is legacy, and today is not real worth to select it. Also, it doesn’t allow increasing the original size of the VDI file. We can solve this problem converting the fixed VDI file to a dynamic VDI.
Steps to increase the size of a VDI file
We will go step by step to increase the size of our GUEST OS. In my case is a DEBIAN Linux Guest OS under Windows 10 as HOST OS. But the process is similar in other configurations.
- Previous steps
- MAKE A BACKUP OF VDI FILE!!!!
- Cloning VDI fixed to VDI dynamic (NOT NECESSARY IF VDI is already dynamic)
- Attach the new VDI file to GUEST OS Setup (in HOST OS)
- Increase the size of VDI file (in HOST OS)
- Increase/modify the configuration of the filesystem inside the GUEST OS (in GUEST OS)
- Check the new size and test it on the GUEST OS
1. Previous steps
1.1 Make a backup of your VDI file.
GUI
If you don’t know where it is the VDI file, you can check directly from the GUI of VIRTUALBOX.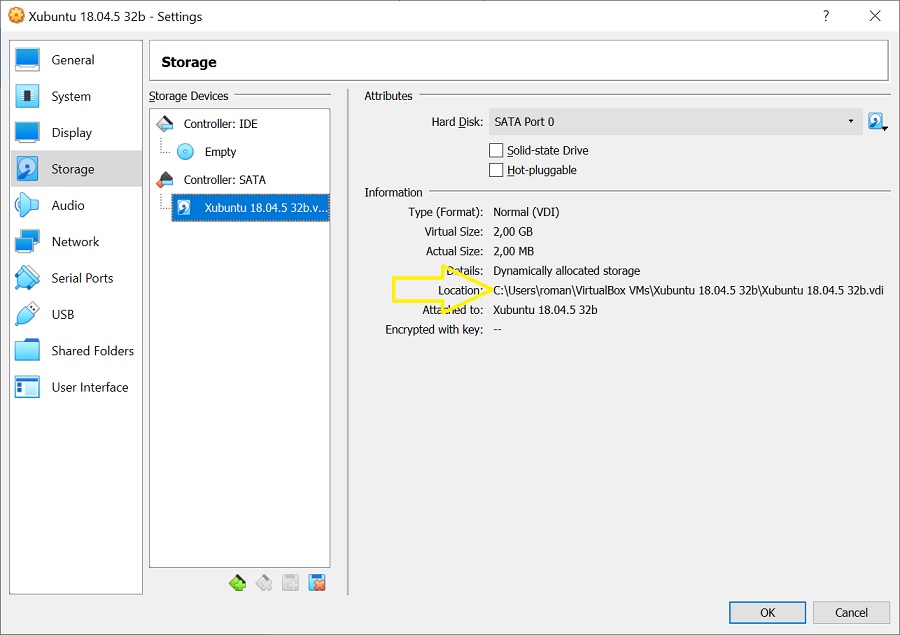
Under settings of the Guest OS, select the STORAGE, and check the PATH to the VDI file.
In general is something like ~/Virtual Box VMs/GuestOsName/GuestOsName.vdi.
On Windows, is the same, but using its path structure C:\users\youruser\Virtual Box VMs\GuestOsName\GuestOsName.vdi.
COMMAND-LINE
Another option is to open a terminal and use the command:
1 | VBoxManage list hdds |
This will show all your VDI files associated with disks in your installed guest OS. In our case:
You can see the path to the VDI file, and also some other info, like the UUID associated.
NOTE: VBoxManage is a commandline application installed with VirtualBox. In a Windows host, you can find it in the folder of the installation, by default: C:\Program Files\Oracle\Virtual Box\VBoxManage.exe. In other host operating system, like *nix family. You can use whereis VBoxManage, but probably is accessible directly. To avoid repetition, add it to your path or use the fullpath to the program when need it.
Too make a backup you just need to copy the VDI file in a safe place when the Guest OS is not running. Don’t skip this step unless you don’t care of loosing everything inside the Guest OS if something from here goes wrong.
1.2 Cloning a fixed VDI file to a dynamic file
This step is needed only if your VDI file was created with fixed size. If you already know that your VDI is a dynamic variant, then, you can jump to the next section.
The fixed variant was useful for old magnetic harddisk. But, this fixed variant of VDI files can not increase its size.
Magnetic hard disks today are mostly for backups, NAS systems, or directly, save permanent files like media files. When your computer has a SSD, and enough space for your GUEST OS, a fixed size VDI format for your Guest OS doesn’t have practical sense. The original reason was to avoid common fragmentation of big files in HDDs.
COMMAND-LINE
To check the format, we can use again VBoxManage
1 | VBoxManage showmediuninfo <uuid|filename> |
We can indicate the UUID or the filename (with full or relative path).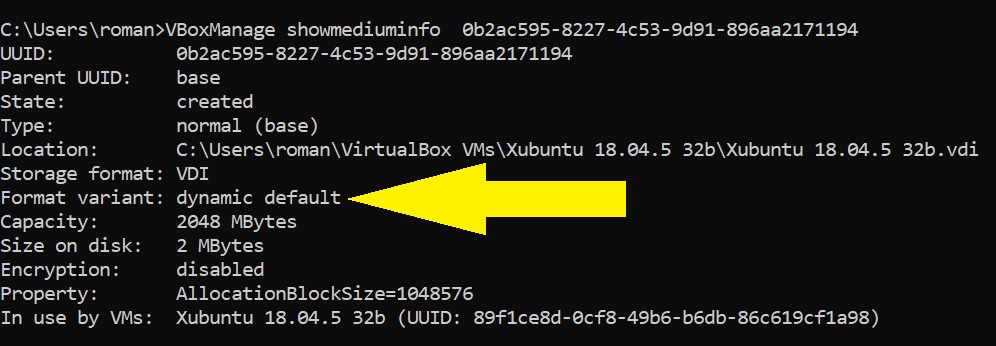
As you see, in this example, the VDI file is already Dynamic. So we don’t need do to do anything else. If your case is the same, go the section 2
GUI
Another option, is using directly the GUI of Virtual Box. You can open the tool Media, and check the VDI file, and then, directly selecting the tab Information after clicking on Properties.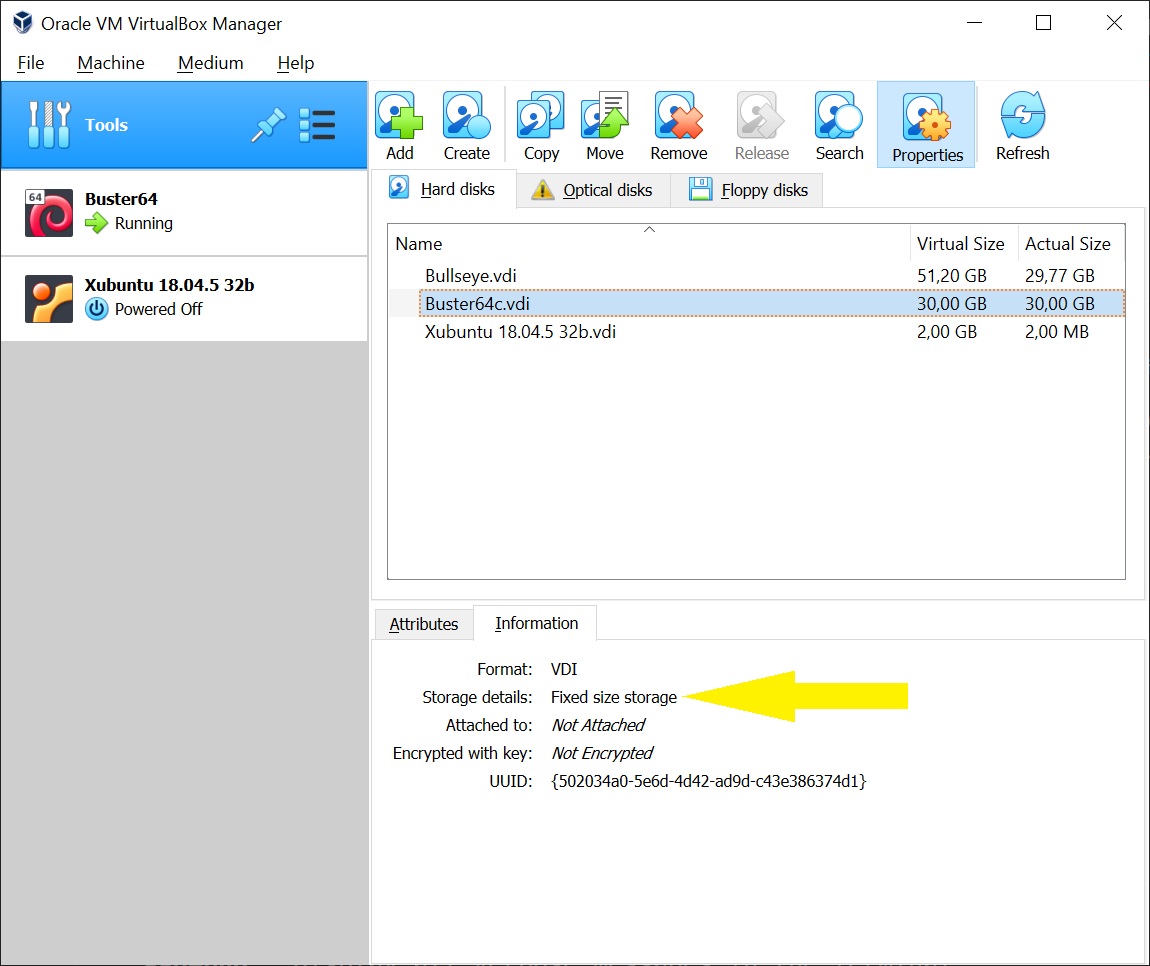
In this case, I show an old VDI file that was fixed size (Buster64c.vdi), and I already cloned in a new file and resized (Bullseye.vdi), that now is dynamic. So, that is the reason because is not attached to any Guest OS. In the case that something would go wrong. You could always attach the original file to your Virtual Machine to avoid losing your data.
ONLY INSTRUCTIONS TO CLONE FROM THE COMMAND-LINE
The command that you need to clone a VDI file is:
1 | VBoxManage clonemedium <uuid|inputfile> <uuid|outputfile> [options] |
For more details check Oracle’s VirtualBox website VBoxManage user guide docs
As an example, I’m going to use the old Buster64c.vdi as input or source file, and Bullseye.vdi as output. In your case, you must use the UUID that corresponds to your old file, or the filename. Unless that you want to overwrite an existing file, you must indicate a new filename for the new clone.
The default options already create a file with VDI format and dynamic variant. Then, just indicating the inputfile and the outputfile, we get a new clone with the dynamic variant.
1 | VBoxManage clonemedium Buster64c.vdi Bullseye.vdi |
Selecting the first or the second line makes no difference except the number of keystrokes.
After a few seconds, the command is complete and we have a new clone dynamic of our old fixed VDI.
1.3 Attach the new VDI file to GUEST OS (in HOST OS)
The next step is attaching the new cloned dynamic VDI file to our Virtual Machine.
To do that, we go to properties of the Virtual Box under the section storage, and select the new VDI file.
- We have to detach the old one,
- Then attach the new one.
- Keep the original port association.

As I said before, all of this is not necessary if you had originally a dynamic variant of the VDI file.
2. Increase the size of VDI file (in HOST OS)
Now, we are ready to increase the size of the VDI file.
GUI
We can use the GUI to enlarge it or VBoxManage (and enough space in our Host hardrive).
Rembember to shut down any Guest OS that could be using your VDI file.
In the MEDIA TOOL from the Virtual Box GUI application, selecting the VDI file, Properties, and the tab Attributes you have a slider that allows you to select the new size. Then APPLY, and your VDI file should be increased when the operation ends.

COMMAND-LINE
The other option, is to use VBoxManage modifymedium.
1 | VBoxManage modifymedium <uuid|filename> --resize x |
Where x is the new size in megabytes.
For example, if we want to increase my the Xubuntu 18.04.5 32b.vdi from 2 GB to aproximately 40 GB, we can use this instruction:
1 | VBoxManage modifymedium 0b2ac595-8227-4c53-9d91-896aa2171194 --resize 40960 |
Note that resizing to smaller size is most of time not allowed.
3. Increase/modify the configuration of filesystem inside the VDI (in GUEST OS)
Now, we can check that the Virtual Box is running, but before, to get profit of the new size of the new virtual disk image, we need to inform the Guest OS. This can be done with loading an iso image of GPARTED to boot in Guest OS. There are other solutions.
Is beyond the scope of this article to tell you how to modify or adapt the disk partition of the virtual device inside your Guest OS.
Depends of several factors, in case that your virtual device is only one drive and one partition, then is pretty straightforward: you must increase the size of that device and partition using the unnallocated space.
In other case, where your file disk partition table has several sections, you should know how to reorganize them without deleting any old partition with your data. Deleting one partition and then creating a new one will wipe out the data inside that partition. Be careful. And check the documentation of your partition tool.
4. Check the new size and test it on the GUEST OS.
If last part were ok, then you can see the new size inside the VirtualBox GUI or using VBoxManage mediumiunfo.
Now, we can boot your Guest OS, and check inside if everything is working as before, but the size of your filesystem has increased as we configured in the previous step with the partition disk tool.
After some testing, we are safe that our Guest OS has more space inside.
Please, feel free to send me any suggestion.
I want to end mentioning the answers in Superuser figuring out how to solve this problem.